Azure Communication Servicesのクイックスタート(チャット)をやってみた
チャットアプリを作ってみたいと思ったので、Azure Communication Servicesのチャットについて調べてみました。今回はコンソールアプリを用いたクイックスタートを使ってみます。
開発環境
Microsoft Visual Studio Community 2019 Version 16.10.3
Azure.Communication.Chat 1.0.1
Azure.Communication.Identity 1.0.1
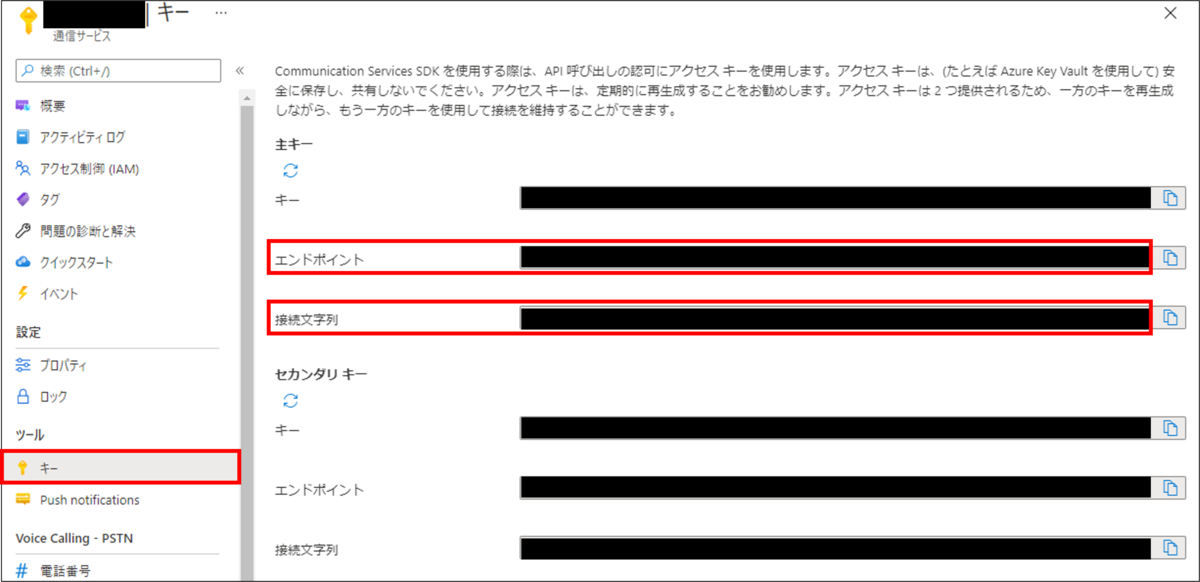
AzureポータルでCommunication Servicesのリソース作成
手順についてはドキュメントに詳細が載っているので割愛します。 docs.microsoft.com
リソースを作成したら、左メニューからキーをクリックして、エンドポイントと接続文字列をメモしておきます。(この後で使います)
クライアントアプリの開発
Visual Studioでコンソールアプリを作成し、Program.csに以下のように記述します。
以下の2つの公式ドキュメントを参考に組み合わせました。
using Azure;
using Azure.Communication;
using Azure.Communication.Chat;
using Azure.Communication.Identity;
using System;

namespace ConsoleApp1
{
    class Program
    {

        static async System.Threading.Tasks.Task Main(string[] args)
        {
            // エンドポイントの設定
            Uri endpoint = new Uri("[エンドポイント]");

            var client = new CommunicationIdentityClient("[接続文字列]");

            //IDの作成
            var identityResponse = await client.CreateUserAsync();
            var identity = identityResponse.Value;

            //アクセストークンの取得
            var tokenResponse = await client.GetTokenAsync(identity, scopes: new[] { CommunicationTokenScope.Chat });
            var token = tokenResponse.Value.Token;

            //チャットクライアントの作成
            CommunicationTokenCredential communicationTokenCredential = new CommunicationTokenCredential(token);
            ChatClient chatClient = new ChatClient(endpoint, communicationTokenCredential);

            //参加者の作成
            var chatParticipant = new ChatParticipant(identifier: new CommunicationUserIdentifier(id: identity.Id))
            {
                DisplayName = "User01"
            };

            //スレッドの作成
            CreateChatThreadResult createChatThreadResult = await chatClient.CreateChatThreadAsync(topic: "Hello world!", participants: new[] { chatParticipant });
            ChatThreadClient chatThreadClient = chatClient.GetChatThreadClient(threadId: createChatThreadResult.ChatThread.Id);

            //メッセージの送信
            SendChatMessageResult sendChatMessageResult = await chatThreadClient.SendMessageAsync(content: "hello world", type: ChatMessageType.Text, senderDisplayName: chatParticipant.DisplayName);
            string messageId = sendChatMessageResult.Id;

            //メッセージの表示
            AsyncPageable<ChatMessage> allMessages = chatThreadClient.GetMessagesAsync();
            await foreach (ChatMessage message in allMessages)
            {
                Console.WriteLine($"{message.Id}:{message.Content.Message} by {message.SenderDisplayName}");
            }
        }
    }
}
これを実行すると以下のようになります。
1627655746772:hello world by User01
1627655746299: by
1627655746269: by
message Id、メッセージ、ユーザー名の順に表示しています。
メッセージは1回しか送っていないのに結果は3つありますね。なぜなんでしょうか?
とりあえず動きはなんとなくわかったので、今後は2つのアプリ間でチャットをできるようにする方法を調べてみようと思います。