BlazorでTooltipを自作する
Blazorでアプリを作っていて、Tooltipを作りたくなりました。Bootstrapを使ってもいいのですが、JavaScriptを書かずに済ませたいと思い、CSSのみで実装する方法について調べました。
環境
Blazor Web App (.NET 8)
コード
Razorコンポーネントには以下のようにHTMLを書きます。
Home.razor
<span class="custom-tooltip">
    <span class="custom-tooltip-text">Tooltipだよ</span>
    ここをマウスオーバー
</span>
CSSには以下のように記載します。
Home.razor.css
/* マウスオーバーした時にツールチップを表示する対象 */
.custom-tooltip {
    position: relative; /* ツールチップの位置の基準に */
    cursor: pointer; /* カーソルを当てたときにポインターに */
    display: inline-block;
}

/* ツールチップのテキスト */
.custom-tooltip-text {
    visibility: hidden; /* はじめは隠しておく */
    position: absolute; /* 絶対配置 */
    left: 50%; /* 親に対して中央配置 */
    transform: translateX(-50%); /* 親に対して中央配置 */
    bottom: -120%; /* 親要素下からの位置 */
    display: inline-block;
    padding: 5px; /* 余白 */
    white-space: nowrap; /* テキストを折り返さない */
    font-size: 0.8rem; /* フォントサイズ */
    line-height: 1.3; /* 行間 */
    background: #333; /* 背景色 */
    color: #fff; /* 文字色 */
    border-radius: 3px; /* 角丸 */
}

/* ホバー時にツールチップの非表示を解除 */
.custom-tooltip:hover .custom-tooltip-text {
    visibility: visible;
}

/*上向きの矢印を作る*/
.custom-tooltip .custom-tooltip-text::after {
    content: "";
    position: absolute;
    bottom: 100%;
    left: 50%;
    margin-left: -5px;
    border-width: 5px;
    border-style: solid;
    border-color: transparent transparent black transparent;
}
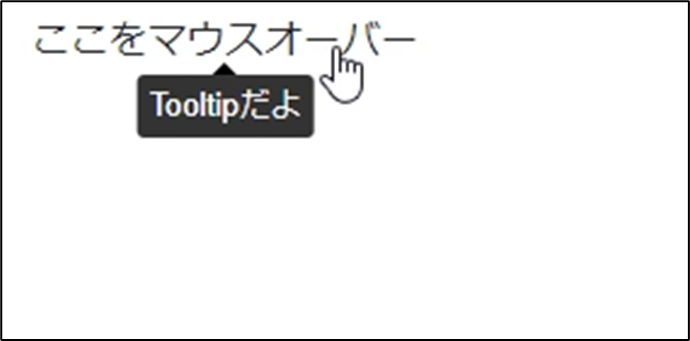
アプリを実行すると以下のようにTooltipが表示されます。
コンポーネントにしてみる
上記の方法はBlazorではなくてもHTML、CSSだけで作れます。
せっかくなので再利用可能なようにコンポーネントにしてみましょう。
razorコンポーネントを以下のようにします。
Tooltip.razor
<span class="custom-tooltip">
    <span class="custom-tooltip-text">Tooltipだよ</span>
    @ChildContent
</span>

@code{
    [Parameter]
    public RenderFragment? ChildContent { get; set; }
}
CSSは先ほどと同じです。
Tooltip.razor.css
/* マウスオーバーした時にツールチップを表示する対象 */
.custom-tooltip {
    position: relative; /* ツールチップの位置の基準に */
    cursor: pointer; /* カーソルを当てたときにポインターに */
    display: inline-block;
}

/* ツールチップのテキスト */
.custom-tooltip-text {
    visibility: hidden; /* はじめは隠しておく */
    position: absolute; /* 絶対配置 */
    left: 50%; /* 親に対して中央配置 */
    transform: translateX(-50%); /* 親に対して中央配置 */
    bottom: -120%; /* 親要素下からの位置 */
    display: inline-block;
    padding: 5px; /* 余白 */
    white-space: nowrap; /* テキストを折り返さない */
    font-size: 0.8rem; /* フォントサイズ */
    line-height: 1.3; /* 行間 */
    background: #333; /* 背景色 */
    color: #fff; /* 文字色 */
    border-radius: 3px; /* 角丸 */
}

/* ホバー時にツールチップの非表示を解除 */
.custom-tooltip:hover .custom-tooltip-text {
    visibility: visible;
}

/*上向きの矢印を作る*/
.custom-tooltip .custom-tooltip-text::after {
    content: "";
    position: absolute;
    bottom: 100%;
    left: 50%;
    margin-left: -5px;
    border-width: 5px;
    border-style: solid;
    border-color: transparent transparent black transparent;
}
このコンポーネントを利用するときは以下のようにします。
<Tooltip>
    ここをマウスオーバー
</Tooltip>
参考にしたサイト
Azure Functions(Node.js)がStreamに対応したのでOpenAIのStreamと組み合わせてみた
少し前ですが、Azure FunctionsのNode.jsでstream対応になりました。
stream対応したということは、OpenAIのstreamの返信をFunctions経由で返すことができるということなので、このブログで検証しようと思います。
※OpenAIのAPIを使います。AzureOpenAIではないです。
環境
@azure/functions 4.0.0
openai 4.38.1
FunctionsはHTTPトリガーを使用
Functions実装
最初に環境変数を設定します。
名前:"OpenAIApiKey"
値:OpenAIのAPIキー
local.setting.jsonに記載する場合は以下のようになります。
{
  "Values": {
      "OpenAIApiKey": "[OpenAIのAPIキー]"
  }
}
ソースコードを書いていきます。
まずOpenAIのパッケージをインストールします。
npm install openai
コードを書いていきます。
まず以下でFunctionsのstreamを有効にします。
app.setup({ enableHttpStream: true });
APIキーを環境変数から取得してOpenAIのクライアントを作成します。
const apiKey = process.env["OpenAIApiKey"];
const openai = new OpenAI({ apiKey: apiKey});
HTTPリクエストを受けてreturnする関数は以下のようにします。
async function httpTrigger1(req: HttpRequest){
    //本文から値を取得
    //想定しているJSONは以下の通り
    //{"prompt": "Hello, World!"}
    const prompt = req.params['prompt'];

    //OpenAIのAPIを呼び出す
    const completion = await openai.chat.completions.create({
        messages: [{ role: "user", content: prompt }],
        model: "gpt-3.5-turbo",
        stream: true
    });

    //streamを生成するgenerator
    const generator = async function* () {
        for await (const chunk of completion) {
            if(chunk.choices[0].finish_reason === "stop"){
                break;
            }
            yield chunk.choices[0].delta.content + '\n';
        }
    };

    //streamを取得
    const stream = Readable.from(generator());

    //streamを返す
    return {
        body: stream,
        headers: {
            'Content-Type': 'text/event-stream',
            'Cache-Control': 'no-store'
        }
    };
};
ポイントとしては以下の通りです。
- OpenAIにリクエストを送るときは
stream: trueにします レスポンスのヘッダーに
'Content-Type': 'text/event-stream','Cache-Control': 'no-store'を設定します
参考: developer.mozilla.orggeneratorのあたりはあまりよくわかっていませんが、見よう見まねで実装しました
全体のコードは以下のようになります。
import { app, HttpRequest } from "@azure/functions";
import OpenAI from "openai";
import { Readable } from "stream";

//streamを使うために必要
app.setup({ enableHttpStream: true });

// APIキーを環境変数から取得
const apiKey = process.env["OpenAIApiKey"];
const openai = new OpenAI({ apiKey: apiKey});

async function httpTrigger1(req: HttpRequest){
    //本文から値を取得
    //想定しているJSONは以下の通り
    //{"prompt": "Hello, World!"}
    const prompt = req.params['prompt'];

    //OpenAIのAPIを呼び出す
    const completion = await openai.chat.completions.create({
        messages: [{ role: "user", content: prompt }],
        model: "gpt-3.5-turbo",
        stream: true
    });

    //streamを生成するgenerator
    const generator = async function* () {
        for await (const chunk of completion) {
            if(chunk.choices[0].finish_reason === "stop"){
                break;
            }
            yield chunk.choices[0].delta.content + '\n';
        }
    };

    //streamを取得
    const stream = Readable.from(generator());

    //streamを返す
    return {
        body: stream,
        headers: {
            'Content-Type': 'text/event-stream',
            'Cache-Control': 'no-store'
        }
    };
};

app.http('httpTrigger1', {
    methods: ['POST'],
    authLevel: 'function',
    handler: httpTrigger1
});
Functions側はこれで完了です。
クライアントの実装
次にFunctionsにアクセスするクライアントをC#のコンソールアプリで実装します。
using System.Text;
using System.Text.Json;

var endpointUrl = "[FunctionsのURL]";
var promptString = "[OpenAIに送信するプロンプト]";

//HttpClientの作成
var client = new HttpClient();

//HTTPリクエストの作成
var request = new HttpRequestMessage(HttpMethod.Post, endpointUrl);

//JSON形式でデータを送信
using StringContent jsonContent = new(
        JsonSerializer.Serialize(new
        {
            prompt = promptString
        }),
        Encoding.UTF8,
        "application/json");
request.Content = jsonContent;

//リクエストの送信
var response = await client.SendAsync(request,HttpCompletionOption.ResponseHeadersRead);

//レスポンスの読み取って表示
using var stream = await response.Content.ReadAsStreamAsync();
using var streamReader = new StreamReader(stream);
while (!streamReader.EndOfStream)
{
    var line = await streamReader.ReadLineAsync();
    if (string.IsNullOrEmpty(line))
        continue;
    Console.Write(line);
}
promptStringにこんにちは。お元気ですか?と設定してプログラムを実行すると以下のようになります。

想定通り少しずつ回答を取得して表示していますね!
参考URL
Azure Functions の Node.js v4 に追加された HTTP Streaming サポートを深掘りする - しばやん雑記
https://platform.openai.com/docs/api-reference/chat/create?lang=node.js
Azure OpenAIのC# SDKを使ってOpenAI(Azureではない)にリクエストを投げる
環境
Azure.AI.OpenAI 1.0.0-beta.15
コンソールアプリ(.NET 6)
実装
まずはクライアントを作成します。
string key = "[OpenAIのAPIキー]";

OpenAIClient client = new(key);
次にモデルの指定やプロンプトの設定を行います。
string modelName = "[モデル名]";

var chatCompletionOptions = new ChatCompletionsOptions()
{
    Messages =
    {
        new ChatRequestSystemMessage("You are a helpful assistant."),
        new ChatRequestUserMessage("Hello")
    },
    DeploymentName = modelName, //デプロイ名っぽいプロパティですが、OpenAIの場合はモデル名を指定します。
};
Messagesには上記のコードに直接List型のオブジェクトを設定することはできません。その代わりに以下のように実装できます。
IList<ChatRequestMessage> messageList = new List<ChatRequestMessage>
{
    new ChatRequestSystemMessage("You are a helpful assistant."),
    new ChatRequestUserMessage("Hello")
};

foreach (var message in messageList)
{
    chatCompletionOptions.Messages.Add(message);
}
こちらのほうが使い勝手がよさそうですね。
最後にOpenAIにリクエストを送って結果を表示します。
var completionsResponse = await client.GetChatCompletionsAsync(chatCompletionOptions);
string completion = completionsResponse.Value.Choices[0].Message.Content;
Console.WriteLine($"Chatbot: {completion}");
全体のコードは以下のようになります。
using Azure.AI.OpenAI;

string key = "[OpenAIのAPIキー]";
string modelName = "[モデル名]";

OpenAIClient client = new(key);


var chatCompletionOptions = new ChatCompletionsOptions()
{
    DeploymentName = modelName,
};

IList<ChatRequestMessage> messageList = new List<ChatRequestMessage>
{
    new ChatRequestSystemMessage("You are a helpful assistant."),
    new ChatRequestUserMessage("Hello")
};

foreach (var message in messageList)
{
    chatCompletionOptions.Messages.Add(message);
}

var completionsResponse = await client.GetChatCompletionsAsync(chatCompletionOptions);
string completion = completionsResponse.Value.Choices[0].Message.Content;
Console.WriteLine($"Chatbot: {completion}");
実行すると以下の結果が得られます。
Chatbot: Hello! How can I assist you today?
参考URL
C#のコンソールでChatGPTと英会話するアプリを作ってみた
はじめに
最近ChatGPTを英語の勉強のために英語で質問するようにしているのですが、「これって会話できないかな?」というのが気になったので作ってみました。
環境
.NET6 コンソールアプリ
Microsoft.CognitiveServices.Speech 1.26.0
コード
OpenAIに質問を投げる
以下のようになります。
static async Task<string> AnswerQuestionAsync(string question, HttpClient client, string openai_api_key)
{
    //OpenAIのエンドポイントを入力
    string endpoint = "https://api.openai.com/v1/chat/completions";

    //OpenAIのエンドポイントに送るリクエスト本文を作成
    var content = JsonContent.Create(new
    {
        model = "gpt-3.5-turbo",
        messages = new List<Message> { new Message("user", question) },
        stream = true
    });

    //リクエストを送る
    HttpRequestMessage requestMessage = new HttpRequestMessage(HttpMethod.Post, endpoint);
    requestMessage.Content = content;// new StringContent(request, Encoding.UTF8, "application/json");
    requestMessage.Headers.Add("Authorization", "Bearer " + openai_api_key);

    Console.Write("");

    HttpResponseMessage response = await client.SendAsync(requestMessage);

    if(response.IsSuccessStatusCode)
    {
        //Choicesの中のcontenを取得
        var resultContent = await response.Content.ReadAsStringAsync();

        var obj = JsonNode.Parse(resultContent)!["choices"]![0]!["message"]!["content"];
        if (obj != null)
        {
            var answer = obj.ToString().Replace("\n", "");
            return answer;
        }
        else
        {
            return "Can not get an answer.";
        }
    }
    else
    {
        return "An error has occurred.";
    }

}
本文のJSONを作成するためのクラスを作っておきます。
class message
{
    public message(string _role, string _content)
    {
        role = _role;
        content = _content;
    }
    public string role { get; set; }
    public string content { get; set; }
}
音声を文字に変換
static async Task<string> OutputSpeechRecognitionResultAsync(string speechKey, string speechRegion)
{
    var speechConfig = SpeechConfig.FromSubscription(speechKey, speechRegion);
    speechConfig.SpeechRecognitionLanguage = "en-US";

    using var audioConfig = AudioConfig.FromDefaultMicrophoneInput();
    using var speechRecognizer = new SpeechRecognizer(speechConfig, audioConfig);

    Console.WriteLine("マイクに向けて話してください。");
    var speechRecognitionResult = await speechRecognizer.RecognizeOnceAsync();

    string answer = "";

    switch (speechRecognitionResult.Reason)
    {
        case ResultReason.RecognizedSpeech:
            Console.WriteLine($"RECOGNIZED: Text={speechRecognitionResult.Text}");
            answer = speechRecognitionResult.Text;
            break;
        case ResultReason.NoMatch:
            Console.WriteLine($"NOMATCH: Speech could not be recognized.");
            break;
        case ResultReason.Canceled:
            var cancellation = CancellationDetails.FromResult(speechRecognitionResult);
            Console.WriteLine($"CANCELED: Reason={cancellation.Reason}");

            if (cancellation.Reason == CancellationReason.Error)
            {
                Console.WriteLine($"CANCELED: ErrorCode={cancellation.ErrorCode}");
                Console.WriteLine($"CANCELED: ErrorDetails={cancellation.ErrorDetails}");
                Console.WriteLine($"CANCELED: Did you set the speech resource key and region values?");
            }
            break;
    }
    return answer;
}
以下のページのコードを参考にしました。
音声テキスト変換クイックスタート - Speech サービス - Azure Cognitive Services | Microsoft Learn
文字を音声に変換
static async Task OutputSpeechSynthesisResultAsync(string text, string speechKey, string speechRegion)
{
    var speechConfig = SpeechConfig.FromSubscription(speechKey, speechRegion);

    speechConfig.SpeechSynthesisVoiceName = "en-US-JennyNeural";

    using (var speechSynthesizer = new SpeechSynthesizer(speechConfig))
    {
        var speechSynthesisResult = await speechSynthesizer.SpeakTextAsync(text);

        switch (speechSynthesisResult.Reason)
        {
            case ResultReason.SynthesizingAudioCompleted:
                Console.WriteLine($"Speech synthesized for text: [{text}]");
                break;
            case ResultReason.Canceled:
                var cancellation = SpeechSynthesisCancellationDetails.FromResult(speechSynthesisResult);
                Console.WriteLine($"CANCELED: Reason={cancellation.Reason}");

                if (cancellation.Reason == CancellationReason.Error)
                {
                    Console.WriteLine($"CANCELED: ErrorCode={cancellation.ErrorCode}");
                    Console.WriteLine($"CANCELED: ErrorDetails=[{cancellation.ErrorDetails}]");
                    Console.WriteLine($"CANCELED: Did you set the speech resource key and region values?");
                }
                break;
            default:
                break;
        }
    }
}
以下のページを参考にしました。
テキスト読み上げクイックスタート - Speech サービス - Azure Cognitive Services | Microsoft Learn
全体のコード
コード全体は以下のようになります。
using System.Net.Http.Json;
using System.Text.Json.Nodes;
using Microsoft.CognitiveServices.Speech;
using Microsoft.CognitiveServices.Speech.Audio;

class Program
{
    async static Task Main(string[] args)
    {
        // Azure Speech Serviceの "SPEECH_KEY" と "SPEECH_REGION"を入力
        string speechKey = "[Azure Speech Serviceのキー]";
        string speechRegion = "[Azure Speech Serviceのリージョン]";

        //OpenAIのAPIキーを入力
        string openai_api_key = "[OpenAIのAPIキー]";

        HttpClient client = new HttpClient();


        var inProcess = true;

        while(inProcess)
        {
            //話した内容を文字として取得
            var questionText = await OutputSpeechRecognitionResultAsync(speechKey, speechRegion);

            //Byeと言われたら終了
            if (questionText.ToLower().Contains("bye"))
            {
                inProcess = false;
            }

            //OpenAIに質問を投げる
            var answer = await AnswerQuestionAsync(questionText, client,openai_api_key);

            //答えを話してもらう
            await OutputSpeechSynthesisResultAsync(answer, speechKey, speechRegion);

        }
    }


    static async Task<string> AnswerQuestionAsync(string question, HttpClient client, string openai_api_key)
    {
        //OpenAIのエンドポイントを入力
        string endpoint = "https://api.openai.com/v1/chat/completions";

        //OpenAIのエンドポイントに送るリクエスト本文を作成
        var content = JsonContent.Create(new
        {
            model = "gpt-3.5-turbo",
            messages = new List<Message> { new Message("user", question) },
            stream = true
        });

        //リクエストを送る
        HttpRequestMessage requestMessage = new HttpRequestMessage(HttpMethod.Post, endpoint);
        requestMessage.Content = content;// new StringContent(request, Encoding.UTF8, "application/json");
        requestMessage.Headers.Add("Authorization", "Bearer " + openai_api_key);

        Console.Write("");

        HttpResponseMessage response = await client.SendAsync(requestMessage);

        if(response.IsSuccessStatusCode)
        {
            //Choicesの中のcontenを取得
            var resultContent = await response.Content.ReadAsStringAsync();

            var obj = JsonNode.Parse(resultContent)!["choices"]![0]!["message"]!["content"];
            if (obj != null)
            {
                var answer = obj.ToString().Replace("\n", "");
                return answer;
            }
            else
            {
                return "Can not get an answer.";
            }
        }
        else
        {
            return "An error has occurred.";
        }

    }


    static async Task<string> OutputSpeechRecognitionResultAsync(string speechKey, string speechRegion)
    {
        var speechConfig = SpeechConfig.FromSubscription(speechKey, speechRegion);
        speechConfig.SpeechRecognitionLanguage = "en-US";

        using var audioConfig = AudioConfig.FromDefaultMicrophoneInput();
        using var speechRecognizer = new SpeechRecognizer(speechConfig, audioConfig);

        Console.WriteLine("マイクに向けて話してください。");
        var speechRecognitionResult = await speechRecognizer.RecognizeOnceAsync();

        string answer = "";

        switch (speechRecognitionResult.Reason)
        {
            case ResultReason.RecognizedSpeech:
                Console.WriteLine($"RECOGNIZED: Text={speechRecognitionResult.Text}");
                answer = speechRecognitionResult.Text;
                break;
            case ResultReason.NoMatch:
                Console.WriteLine($"NOMATCH: Speech could not be recognized.");
                break;
            case ResultReason.Canceled:
                var cancellation = CancellationDetails.FromResult(speechRecognitionResult);
                Console.WriteLine($"CANCELED: Reason={cancellation.Reason}");

                if (cancellation.Reason == CancellationReason.Error)
                {
                    Console.WriteLine($"CANCELED: ErrorCode={cancellation.ErrorCode}");
                    Console.WriteLine($"CANCELED: ErrorDetails={cancellation.ErrorDetails}");
                    Console.WriteLine($"CANCELED: Did you set the speech resource key and region values?");
                }
                break;
        }
        return answer;
    }


    static async Task OutputSpeechSynthesisResultAsync(string text, string speechKey, string speechRegion)
    {
        var speechConfig = SpeechConfig.FromSubscription(speechKey, speechRegion);

        speechConfig.SpeechSynthesisVoiceName = "en-US-JennyNeural";

        using (var speechSynthesizer = new SpeechSynthesizer(speechConfig))
        {
            var speechSynthesisResult = await speechSynthesizer.SpeakTextAsync(text);

            switch (speechSynthesisResult.Reason)
            {
                case ResultReason.SynthesizingAudioCompleted:
                    Console.WriteLine($"Speech synthesized for text: [{text}]");
                    break;
                case ResultReason.Canceled:
                    var cancellation = SpeechSynthesisCancellationDetails.FromResult(speechSynthesisResult);
                    Console.WriteLine($"CANCELED: Reason={cancellation.Reason}");

                    if (cancellation.Reason == CancellationReason.Error)
                    {
                        Console.WriteLine($"CANCELED: ErrorCode={cancellation.ErrorCode}");
                        Console.WriteLine($"CANCELED: ErrorDetails=[{cancellation.ErrorDetails}]");
                        Console.WriteLine($"CANCELED: Did you set the speech resource key and region values?");
                    }
                    break;
                default:
                    break;
            }
        }
    }
}

//JSON作成用のクラス
class Message
{
    public Message(string _role, string _content)
    {
        role = _role;
        content = _content;
    }
    public string role { get; set; }
    public string content { get; set; }
}
「Bye」という単語が含まれるまで繰り返し会話ができます。ぜひ試してみてください。
C#を使ってOpenAIのAPIからの結果をChatGPTのように順次表示する方法
はじめに
ChatGPTは回答が一気に表示されるのではなく、少しずつ表示されます。これができたらユーザーは待機時間が短く感じらますよね。
今回はChatGPTのAPIを利用してどのように実装するのかを調査してみました。
環境
.NET 6 コンソールアプリ
OpenAIのモデル:gpt-3.5-turbo
ポイント
結果を順次受け取るようにする際のポイントをまとめました。
streamパラメータの設定
以下記事の通り、APIにリクエストを送る際のパラメータでstreamをtrueにする必要があります。
https://platform.openai.com/docs/api-reference/chat/create#chat/create-stream
結果の受け取り
上記のようにstreamを有効にした場合、結果は以下のようなJSONになります。
data: {
    "id": "...",
    "object": "...",
    "created": ...,
    "model": "gpt-3.5-turbo-0301",
    "choices": [
        {
            "delta": {
                "content": "..."
            },
            "index": 0,
            "finish_reason": null
        }
    ]
}

data: {
    "id": "...",
    "object": "...",
    "created": ...,
    "model": "gpt-3.5-turbo-0301",
    "choices": [
        {
            "delta": {
                "content": "..."
            },
            "index": 0,
            "finish_reason": null
        }
    ]
}

(省略)

data: [DONE
]
上記はすべての結果をまとめて表示していますが、コードを実行した際にはdata:[JSON形式のデータ]という結果を繰り返し取得できます。このままではJSONに変換しにくいので「data:」の部分は削除すると扱いやすいです。
また、回答はcontentの中にあるのでJSONの解析でこの値を取得するといいでしょう。
コード
では実際にコードを見てみましょう。C#のコンソールアプリでの例です。
using System;
using System.Collections.Generic;
using System.IO;
using System.Net.Http;
using System.Net.Http.Json;
using System.Text.Json.Nodes;
using System.Threading.Tasks;

class Program
{
    static async Task Main(string[] args)
    {
        string key = "[OpenAIのAPIキー]";

        Console.WriteLine("質問を入力してください。");
        string question = Console.ReadLine();

        Console.WriteLine("--------------------------------------");

        var client = new HttpClient();
        var request = new HttpRequestMessage(HttpMethod.Post, "https://api.openai.com/v1/chat/completions");
        request.Headers.Add("Authorization", $"Bearer {key}");

        var content = JsonContent.Create(new
        {
            model = "gpt-3.5-turbo",
            messages= new List<message> { new message("user", question) },
            stream = true
        });

        request.Content = content;

        var response = await client.SendAsync(request, HttpCompletionOption.ResponseHeadersRead);
        using var streamReader = new StreamReader(await response.Content.ReadAsStreamAsync());

        while (!streamReader.EndOfStream)
        {
            var line = await streamReader.ReadLineAsync();
            if (string.IsNullOrEmpty(line))
                continue;

            //冒頭の[data]を削除
            line = line.Remove(0, 6);

            //[DONE]の場合は終了
            if (line == "[DONE]")
                continue;

            var resultContent = JsonNode.Parse(line)?["choices"]?[0]?["delta"]?["content"]?.ToString();
            if(resultContent != null)
                Console.Write(resultContent);  //結果をコンソールに表示
        }
    }
}

class message
{
    public message(string _role, string _content)
    {
        role = _role;
        content = _content;
    }
    public string role { get; set; }
    public string content { get; set; }
}
実行結果
以下のように結果が順次表示されました。
OpenAIを使ってみた
最近よく聞くOpenAIのAPIを使ってみました。
環境
Python 3.9.13
Visual Studio Code 1.75.0
手順
APIキーの取得
以下のページからログインします。(利用にはサインアップが必要です)
https://beta.openai.com/
ログインしたら以下のページからAPIキーを取得できます。
https://platform.openai.com/account/api-keys
コードを書く
今回はPythonのライブラリを使うので以下のコマンドでインストールします。
pip install openai
これでライブラリを使う準備は完了です。
OpenAIでできることは以下のページにまとめられています。
https://platform.openai.com/examples
今回はQ&Aのサンプルコードを少し修正して使います。
import openai

question = "Where is the Valley of Kings?"

# 本来APIキーはソースコードに含めてはいけないのですが、今回は動作確認なのでここで設定します
openai.api_key = "[OpenAIのAPIキー]"

response = openai.Completion.create(
  model="text-davinci-003",
  prompt="I am a highly intelligent question answering bot. If you ask me a question that is rooted in truth, I will give you the answer. If you ask me a question that is nonsense, trickery, or has no clear answer, I will respond with ""Unknown"". Q: " + question  + " A:",
  temperature=0,
  max_tokens=300,
  top_p=1,
  frequency_penalty=0.0,
  presence_penalty=0.0,
  stop=["\n"]
)

# 翻訳結果の表示
print(response["choices"][0]["text"])
結果は以下のようになりました。
The Valley of the Kings is located in Egypt, on the west bank of the Nile River in Luxor.
ソースコードのquestionを変更すると色々質問することができます。是非皆さんも使ってみてください!
スクリプトから3Dモデルを読み込む【MRTK】
はじめに
Unityで3Dオブジェクトを読み込むためにはUnityのプロジェクトにドラッグアンドドロップでインポートする方法があると思います。今回はその方法とは別に、スクリプトから3Dオブジェクトを読み込む方法を調べてみました。
環境
MRTK 2.8.2
Unity 2020.3.27f1
手順
基本的な使い方はMixed Reality Toolkit ExamplesのDemos - Gltfを見ていただければわかると思います。
以下のような方法でgltfまたはglb形式の3Dモデルを読み込みGameObjectとして扱うことができます。
名前空間:Microsoft.MixedReality.Toolkit.Utilities.Gltf.Serialization
//gltfから読み込む場合
string path = "[ファイルパス]";
var gltf = await GltfUtility.ImportGltfObjectFromPathAsync(path);
GameObject gltfobj = gltf.GameObjectReference;

//glbから読み込む場合
byte[] glbbytearray = ~~~; //何らかの形でglb形式の3Dモデルをバイト配列で取得
var gltfObject = GltfUtility.GetGltfObjectFromGlb(glbbytearray);
GameObject gltfobj = await gltfObject.ConstructAsync();
上記のどちらを使う場合でも、異なる形式の3Dモデルを読み込もうとすると例外になるので例外処理をする必要があると思います。
この方法を使えばクラウドのストレージから呼び出すなんてこともできるので応用が利きそうですね。